This is part 3 of my series "A Beginner's Guide to Software Defined Networking (SDN) inside Proxmox" where we setup, configure and test the capabilities of the Proxmox SDN System.
- Part 1: A Beginner's Guide to Software Defined Networking (SDN) inside Proxmox - Bennet Gallein IT Solutions Blog.
- Part 2: A Beginner's Guide to Software Defined Networking (SDN) inside Proxmox - Part 2 - Bennet Gallein IT Solutions Blog
In this part, we want to take a deeper look at VXLAN, the technology behind it and the problems it solves.
What is VXLAN?
You might have heard from VLANs, which are a way to encapsulate packets inside of a LAN with the help of the 802.1Q IEEE standard, enabling the use of different LANs inside of a single LAN, using the same physical infrastructure for different LANs. As the cloud grew and more customers moved to the cloud two disadvantages crystalized:
- Every network equipment needs VLAN tagging capabilities, meaning each switch must be configured to support VLANs (which is not really a deal breaker since most - even unmanaged - switches nowadays support tagging out of the box).
- There is a strict size limitation on the number of VLANs you can have in a single LAN. Due to the size of the Tag in the Ethernet-Frame being only 32 bit, this means the maximal number of VLANs you can have is 4096.
So, in August of 2014 the RFC 7348 was submitted, a collaborative work by Cisco Systems, VMware and Arista Networks, with the simple title "Virtual eXtensible Local Area Network".
VXLAN creates an overlay network between 1 or many nodes in a network and adds 24 bits to the packet header, allowing for an astonishing 16.777.215 encapsulated networks, which in itself could hold each 4096 VLANs, which is far enough for even the big cloud providers these days.
In short: VXLAN creates an overlay network, allowing roughly 16 million separated networks to be created.
VXLAN in Proxmox
Since Proxmox is running on Debian it uses the Open vSwitch package to realize nearly anything that's provided inside the SDN package.
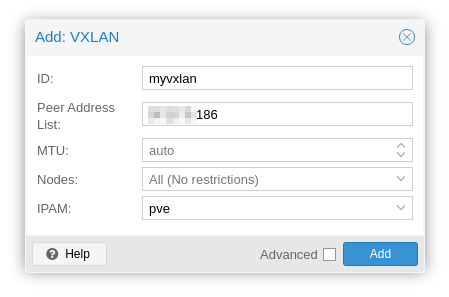
Creating a new VXLAN zone is straight forward and simple.
Now, we need to create a VNet, navigate over to the VNets tab and click the top left button.
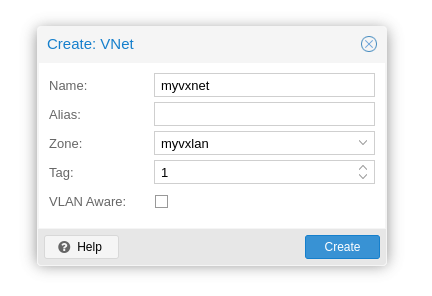
We also give this a name here and assign our zone. VXLANs also need a tag, but we can just take 1 and increment from there on forever (or untill we hit the 16 million). You can also enable the "VLAN Aware" option, meaning the network interface on the VMs will become VLAN aware, meaning you can do VLANs inside of the VXLAN.
Now you can in theory create subnets for the VNet, but - since traffic is encapsulated - they are not used here. You have to set the IP either static on the network adapater, inside the VM or use a DHCP server inside the VXLAN network. Again, remember that a VXLAN network is just a normal LAN.
Next, update (or create) the VMs/Container that you want to use, I'm using the containers from part 2 for my testing:
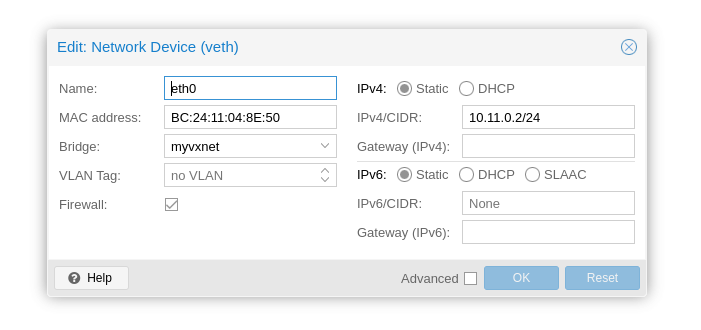
I changed the Bridge to my newly created VXLAN and set a static IP. I use the first IP as the gateway, so that'd be 10.11.0.1 in this case (not in the picture).
Now, let's login to the container and have a look at the network interfaces:
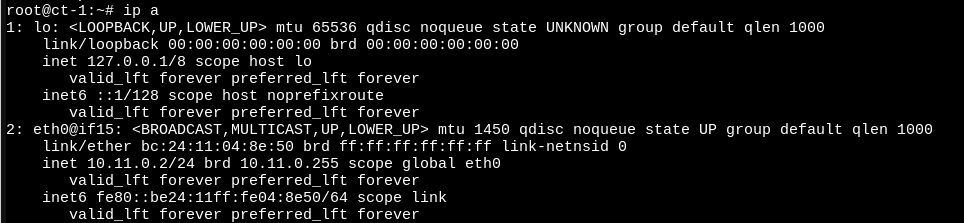
As you can see, we have the correct IP and an MTU of 1450, which is 50 bytes lower than the MTU of my servers network interface. This is due to the encapsulation mentioned earlier.
We can now try to ping the other container:
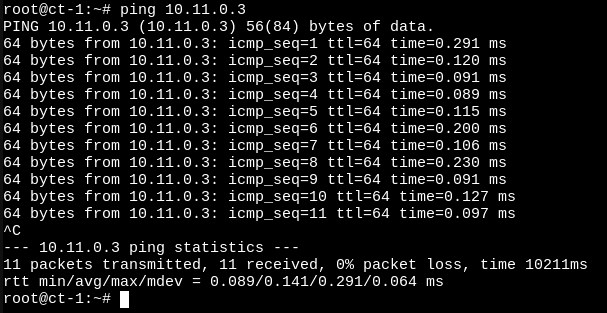
As you can see, things turn out to work well.
Summary
We've successfully created a VXLAN overlay network on our Proxmox Host and added two containers to it which can communicate with each other. We've learned that VXLAN is a neat standard which enables us to completely sepere traffic inside a LAN from other VLANs, giving customers (or us) perfect privacy inside that network.
Remember, this works over many nodes, not just limited to one like i've used in this tutorial. Try adding more nodes to your VXLAN, move VMs around and test speeds and ping! VXLANs are a powerful tool that your customers can really benefit from.
Sources: